|
|
OUT IN THE GARDEN & AROUND THE YARD...
|

|

EVERY FAMILY CAN GROW IN CONTAINERS
It's October 11th, and the weather is cooling down. If you thought you didn't have enough space to grow vegetables, you should know that everyone can grow in containers, even if you live in an apartment or condo. You can also start some vegetables in containers now if you have gotten off to a late start, and then just bring them in before the first frost hits. You can grow those vegetables and herbs indoors during the Winter, so you always have fixings for fresh salads.
Please Plant a Garden. If you don't have a big yard, or any yard at all, you can still plant in containers. I feel now more than ever that we will need to grow Home Gardens, and be able to help Feed our Families. We are in a very uncertain time in our Countries history, and we need to be prepared.
There are several types of containers that can be used for growing vegetables including polyethylene plastic bags, clay pots, plastic pots, metallic pots, milk jugs, ice cream containers, bushel baskets, barrels, and planter boxes. It is important to use containers that can accommodate roots of the vegetables you want to grow as the vegetables vary in sizes and rooting depths.
The container needs to have good drainage, and should not contain chemicals that are toxic to plants and human beings. Most vegetables grown in backyard gardens can be grown in containers, although a container's diameter and depth needs to be considered when selecting what vegetables to grow. The plant density (number of vegetable plants per container) depends on individual plant space requirements, and rooting depth.
It's best to use one of the potting mixes in vegetable container gardening as they are light, disease-free, weed seed-free, and have good drainage. Some potting mixes have pre-mixed plant nutrients, so read the information on the label about how long the pre-mix will feed your plants before you start applying fertilizers. You can also make your own two bushels of potting mix using the following recipe: Shredded sphagnum peat moss (1 bushel), Vermiculite (1 bushel), Ground limestone (1¼ cups), Phosphate fertilizer either 0-20-0 (½ cup) or 0-45-0 (¼ cup), Slow release granular fertilizer such as 5-10-5 (1 cup).
Container-grown plants require more frequent fertilization than field-grown plants because of the limited space within the container for drawing nutrients. Fertilizers can be mixed with the soil mix before filling the container and can also be applied as a nutrient solution. Nutrient solutions can be made by dissolving soluble fertilizer such as 10-20-10, 12-24-12 or 8-16-8 in water following label directions. The nutrient solution is applied once a day when the plants are watered. How often you water may vary with vegetables, but once a day is adequate.
Leach the unused fertilizer nutrients from the potting mix once a week by applying tap water only. It is also very important to water occasionally with a nutrient solution containing micro nutrients such as copper, zinc, boron, manganese, and iron and follow label directions in order to give plants the right amounts.
Plants grown in containers need frequent watering as the containers dry fast. Watering on a daily basis is necessary to provide adequate moisture for plant growth. Apply enough water to reach the bottom of the container. Allow the excess to drain out through drainage holes. Avoid wetting the leaves when watering as this will encourage development of foliar disease. Try not to allow the containers to dry out completely between watering as this will lead to flower and fruit drop. Do not over water the plants as the container will be waterlogged and the roots will lack oxygen leading to poor growth and eventually, perhaps, the plant's death.
The size of the containers needed will depend a lot on the vegetable or herbs you are planting. Most Herbs can be planted in 1/2 - 1 gallon containers. Cabbages, Cucumbers, Green Beans, Leaf Lettuce, Spinach, Swiss Chard, and Cherry Tomatoes can be planted in 1 gallon containers. Beets, Carrots, Eggplants, Peppers and Radishes need 2 gallon containers. Your regular tomatoes will need 3 gallon containers. (great info from the University of Illinois Extension)
When you need some great Non GMO Heirloom Seeds for your containers, please visit our THE SEED GUY website. We have a great 60 Variety Heirloom Seed package with SALE Pricing Now at $79, with 34,000 Seeds, and fresh from the New Fall 2023 Harvest--) https://theseedguy.net/.../50-60-variety-heirloom-seed... and we still hand count and package our Seed varieties, like the old days, so you get the best germination.
We also have 8 other Heirloom Seed packages, in different sizes, and also all our individual varieties in Stock Now on our Seed Guy website. https://theseedguy.net/15-seed-packages
You can also Call Us 7 days a week, and up to 10:00 pm each night, at 918-352-8800 if you would rather Order By Phone.
If you LIKE US on our Facebook page, you will be on our list for more great Gardening Articles, new Heirloom Seed Offers, and healthy Juice Recipes. https://www.facebook.com/theseedguy/ Thank you, and God Bless You and Your Family.
5 Plants to Never Grow Near Carrots & 10 Beneficial Companions
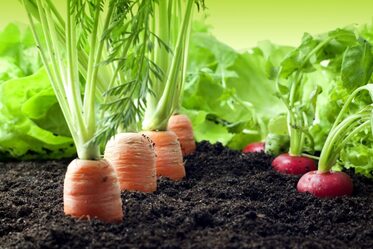
Carrots are delicate plant that requires special attention to produce healthy tubers. They are root crops that can be affected by pests that reside in the soil. Fortunately, there is a solution to this problem: companion planting.
By planting carrots alongside other vegetables, herbs, or flowers, you can reduce the risk of pests and improve the quality of your crop.
Carrots are best grown during spring and summer and can be eaten raw in salads or cooked with a variety of meals. They are highly nutritious and provide essential vitamins to the body.
The best way to protect this crop is by planting it with compatible companions, such as rosemary, chives, legumes, thyme, leeks, tomatoes, radish, brassicas, nasturtiums, and onions. Avoid planting carrots alongside potatoes, dill, celery, and parsnips, as these plants can hinder carrot growth.
Companion planting has numerous benefits. It improves the yield of your carrot crop, keeps pests at bay, and enhances the flavor of your carrots. Additionally, companion planting can help your carrots retain their vitamins, making them even more nutritious.
Incorporating carrots into your garden is an excellent idea, as they are versatile and delicious. Some companion plants will encourage carrot growth, making them an excellent choice for any garden. With proper care and attention, you can enjoy a bountiful harvest of nutritious and tasty carrots.
READ MORE . . . 5 Plants to Never Grow Near Carrots & 10 Beneficial Companions - Daily News and Tips (usnews3.com)
|
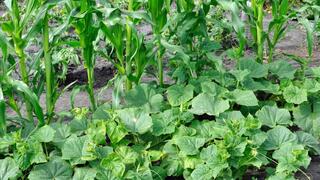
Did you know that corn, beans, and squash are called the “Three Sisters”? A number of Native American tribes interplanted this trio because they thrive together, much like three inseparable sisters. Here’s how to plant your own Three Sisters garden.
What Is a Three Sisters Garden?The Three Sisters method is companion planting at its best, with three plants growing symbiotically to deter weeds and pests, enrich the soil, and support each other. Instead of today’s single rows of a single vegetable, this method of interplanting introduced biodiversity, which does many things—from attracting pollinators to making the land richer instead of stripping it of nutrients. In a sense, we take no more from nature than what we give back. |
GARDENING
|
|
|
|
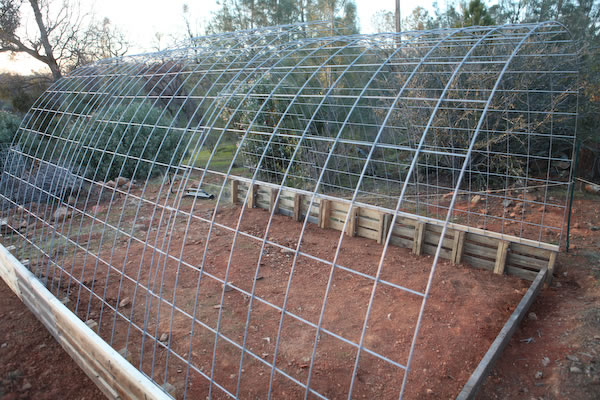
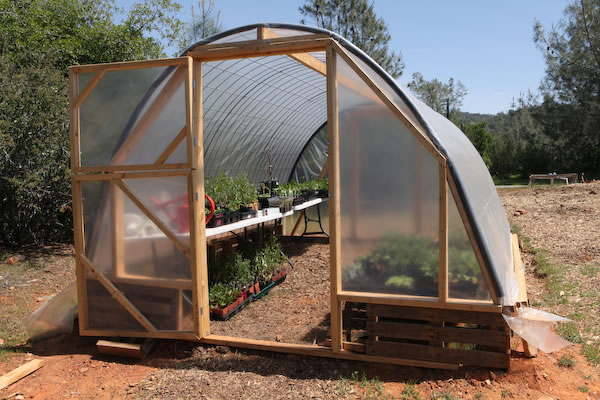
EXTENDING YOUR GROWING SEASON WITH A GREENHOUSE
This Greenhouse is easy to build, and would be a great way for you to get an early start every Spring, and then to extend your season into the Fall/Winter. You would be able to grow healthy Vegetables for your Family almost year round (depending on where you live). Here is the info for the greenhouse. With the big increase in lumber prices, using pallets, and other lower cost items would be the way to build this.
A lot of thought and planning went into the design and construction of this Greenhouse. With cost being one of the number-one constraints for the project, we thought it best to use what we had on hand – pallets, cattle panels, and some new materials to give it good rigidity. We ended up with a Quonset/High-Tunnel-style greenhouse. Estimated Final Cost: $400 Dimensions were 9' x 12.5'. With 2022 prices being higher on materials, I'm not sure what it would equate to now.
The size of greenhouse was largely determined by the construction materials on hand. The big decision was how many cattle panels to use. The panels we had were 50 inches tall and 16 feet long. We originally were only going to use two panels, but you should always go bigger that you think you need or want, so we went with three panels. This gave us 12.5' as the length of our greenhouse. Then for the width we determined that 9' as the base of our arch gave us about 6.5' of head room once we placed the panels on the mini 13" pallet foundation.
You can make the width as wide or as narrow as you like, but keep in mind that too wide a span will not have enough tension in the arch to support itself and a ridge beam will be needed.
After viewing the aftermath of high winds on tarps for cattle panel goat shelters, and hearing stories of people chasing their plastic down the field from their PVC high tunnels, we knew that special consideration was needed for the storms and winds we get in our area. We had to make sure that the covering was tight and would not tear in high winds. To accomplish this, we planned on using 1" x 2" wood strips to pull the plastic tight and secure it. We also added protective end caps (made from 1/2' pipe insulation) on the cattle panel to protect the plastic from puncture holes.
There are three types of plastic film that can be used for a greenhouse. They are: 1) a single-season non-UV 6 mil plastic from home depot or other local hardware store, 2) a UV stable 4-year greenhouse plastic, and 3) a re-enforced UV stable greenhouse plastic. The home depot type plastic is very cheap, but is really not designed for use on greenhouses, and breaks down quickly. We ended up using the basic 4-year greenhouse plastic, and were able to cover all surfaces with a 20' x 20' piece.
With the base of the greenhouse being constructed out of mini pallets, we were able to incorporate base venting into our greenhouse. We had also planned a front door and a back zip-up door, but ended up not using the zip door, and instead added an automatic vent opener and window in the rear of the greenhouse.
First we selected our spot and leveled the foundation. We used mini pallets to build the base of the greenhouse. We screwed them together, and then carried them out in whole segments to the foundation. Each of the mini pallets measured 13" in length. For our 12.5' greenhouse, we used 12 pallets on each side. This gave us a little bit of excess, which was sawed off later.
We applied re bar braces pounded into the ground on the inside with conduit straps to secure the foundation to the ground. Didn't want the whole structure to fly away one night. Then we added 3' steel spikes on the outer walls to counter the force of the panels pushing outward. We used a 2 x 2 board as a bracing beam to hold the panels even, and then used fence staples to secure the cattle panel to the base pallets.
Once all three cattle panels were in place, we used bailing wire to secure the panels together and made sure the cut point faced inward as to not puncture the greenhouse plastic. We framed in the front and back end walls. The plastic was then stretched over the ends and secured with 1x2 wood strips to the end wall pieces. This made the plastic very tight and secure.
After the front and back walls were framed, we added pipe insulation to the ends of the cattle panels as a way to help protect the plastic from the sharp edges of the panels. A ridge beam was added for additional stabilization. We used left over plastic to build the door, which was designed to be open partially or all the way.
In order to secure the plastic along the sides of the greenhouse, the plastic was sandwiched between a 2x2 and a 1x2. This allows the option of either keeping the plastic on the ground (and covering the pallet vents) or easily propping it up to allow for more airflow on hot days. We then added a rear wall automatic vent opener. The window opens as the heat rises and greatly increases the airflow as it opens.
** After building your Greenhouse, you will want to start some Great Non GMO Heirloom Seeds. At THE SEED GUY, All of our Heirloom Seeds are Small Farm-Grown, Fresh from the New Fall 2023 Harvest, and we hand count and package them, like the old days, so you get the best germination.
You can go to our website to see Sale Pricing on our 10 Non GMO Heirloom Seed packages, and all our individual varieties in Stock Now at --) https://theseedguy.net/15-seed-packages
You can also Call Us 7 days a week, and up to 10:00 pm at night, at 918-352-8800 if you would like to Order By Phone.
If you LIKE US on our Facebook page https://www.facebook.com/theseedguy you will be able to see more of our great Gardening articles, New Seed Offerings and healthy Juice Recipes. Thank you and God Bless You and Your Family.
IT IS A GOOD TIME NOW TO ADD TO YOUR COMPOST PILE
It's September 20th, has cooled off a bit, and we have at least one more good grass cut ahead of us. This would be a good time to add to your compost pile. For best results, you will want to use a mixture of ingredients. The right balance is something learned by experience, but it's best to always use equal amounts by volume of Greens and Browns, and layer them. (SEE LISTS BELOW).
Some things, like grass cuttings and weeds, rot quickly. They work as 'activators', getting the composting started. Older and tougher plant material is slower to rot, but gives body to it, and usually will make up the bulk of your compost heap.
COMPOST MATERIALS
"GREENS" or nitrogen rich ingredients
Urine (dilute it with water)
Grass cuttings
Raw vegetable peelings from your kitchen
Tea bags and leaves, coffee grounds
Young green weed growth... avoid weeds with seeds
Green Tree Prunings
Animal manure from --rabbits, goats, cows, horses, chickens
"BROWNS" or carbon rich ingredients - slow to rot
Cardboard
Waste paper and junk mail
Pet Bedding materials
Hedge clippings
Old plants
Wood shavings
Fallen leaves
Wood ash
Crushed Egg Shells
You can gather enough material to fill your compost container or pile, at one time, or you can add to it as you get material. Make sure you have a mixture of soft and tough materials. You can chop up tough items using shears, and chop up leaves with a shredder--if you have one.
Mix ingredients together as much as possible before adding to your compost bin. I like to do a layering process, with one layer of "Brown" items; such as the fallen leaves on the ground and cardboard from old shipping boxes, and then I add a "Green" layer on top of that; with our rabbit poop/pee and left over veggies and tea bags. Then you do another layer of each until you fill your bin, or if you are just doing a compost heap in your yard---until you get it up to about 36 inches high. Water your Compost Bin or Compost Heap as you go.
Within a few days, the heap is likely to get hot to the touch. When it begins to cool down, or a week or two has passed, turn the heap. Add water if it is dry, or dry material if it is soggy. The heap should heat up again; the new supply of air you have mixed in allows the fast acting microbes to continue with their work. You can continue to stir your compost bin or heap every couple weeks, but the heating will be less and less. When it no longer heats up again, leave it undisturbed to finish composting. When your Composting materials in your bin or your Composting heap in yard have turned into a dark brown, earthy smelling material, the composting process is complete. It is always best to start in the Late Summer or Fall, though you can start a pile in the Spring, and keep adding to it through the year.

How to Grow Cantaloupe: 15 Steps (with Pictures) - wikiHow
Tips for Growing Cantaloupe That's So Juicy It's Worth the Effort (bhg.com)
How to Grow and Care for Cantaloupe (thespruce.com)
How to Plant, Grow, and Care For Cantaloupe (allaboutgardening.com)
How To Grow Cantaloupe: 6 Growing Tips - Growfully
Tips for Growing Cantaloupe That's So Juicy It's Worth the Effort (bhg.com)
How to Grow and Care for Cantaloupe (thespruce.com)
How to Plant, Grow, and Care For Cantaloupe (allaboutgardening.com)
How To Grow Cantaloupe: 6 Growing Tips - Growfully
How To Grow Watermelon (Detailed Instructions) - Growfully
How to Grow and Care for Watermelon (thespruce.com)
How to Plant, Grow, and Harvest Watermelon - Harvest to Table
Growing Watermelons: How To Grow Watermelons (gardeningknowhow.com)
How to Grow Watermelon That's Sweet and Juicy (bhg.com)
How To Grow And Care For Watermelon (southernliving.com)
8 Secrets to Grow Amazing Watermelon + How to Know When They're Ripe (ruralsprout.com)
How to Grow Watermelon: 7 Tips for Growing Watermelon - Growing In The Garden
TIPS AND TRICKS TO GROWING AND CULTIVATING...
|
|


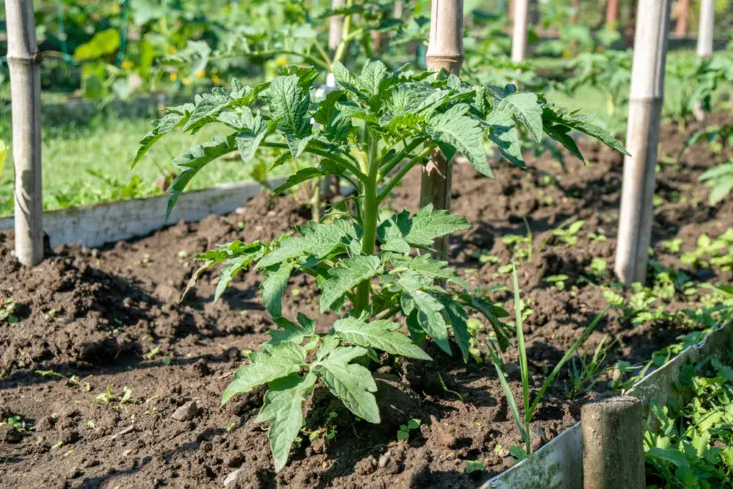
7 Plants To Never Grow Near Your Tomatoes
|
Whether you’ve experienced it yourself, or know someone who has, you likely understand how awful a bad neighbor can be.
Out in the garden, your tomato plants feel the same way (not about your neighbors – they’re probably impartial – but theirs). The neighbors of your tomato plants can have a massive impact on their health. There are fantastic companion plants that help deter pests and improve health. The tomatoes may even help these plants out in return. We’ve written about plants you should grow next to your tomatoes here. You probably already know that planting marigolds with tomatoes is a good idea. Then there are awful companion plants that do everything in their power to bring your tomatoes down. Avoid the bad neighbors, plant some of the good ones, and you’ll be on your way to happier and healthier tomato plants. |

|


Regrow Pineapples from Store Bought Pineapples!


|
From Movies to Television... From Classic Re-Runs to New Top Favorites...
HOME
|
